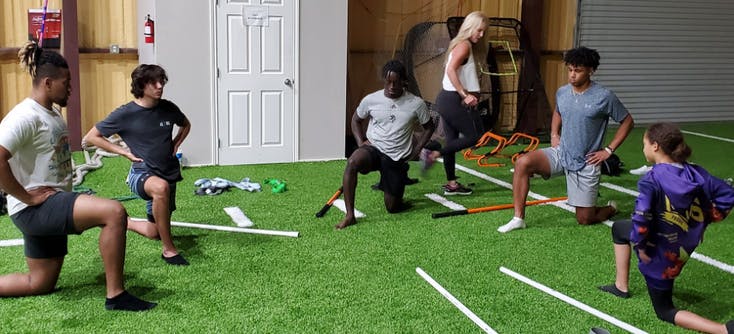
Small group personal training is a way of expanding the classic one-to-one model for personal training and offering training sessions for groups of 10 or less, although the typical (and recommended) size is four to six. Group training sessions can still include the same workouts and exercises that you'd offer as a one-to-one PT.
With some simple alterations to how you'd manage sessions, you can easily and effectively expand your business by offering small group training sessions. In this article, we break down the differences between one-to-one PT and small group training and show you how to set up this business model, as well as successfully operate it in your software.

What are the benefits of small group training for you as a business owner?
It may seem obvious, but the more clients you have, the more you will make. However, modifying your pricing for small group training in comparison to one-to-one training sessions is how you will catch the attention of potential clients. Instead of training one client for, say, $30 per hour, you can offer a session to four or five clients at a lower price. You'll be enticing more people to sign up for your competitively priced sessions while also increasing your hourly earnings.
What are the benefits of small group training for your clients?
Offering small group training sessions isn't just a business model that will prove beneficial for you, it will actually be beneficial for your clients as well. While group classes for yoga, Zumba, or spinning for example are great for people to stay fit with a regular training session or practice, a small group training session offers more of a tangible progression. With a personal trainer setting personal goals in a group, your clients will motivate each other and become accountable to each other. Building a rapport and a sense of community in a fitness context is unique, and you're also more likely to see consistency in attendance each session.
What is the best structure for small group training businesses?
Aiming to have groups of up to six clients in each program is a good number for both trainer and client. With six clients, you can still enjoy a good group dynamic in your sessions, but you'll also be able to give a good amount of one-to-one time with each client correcting form during workouts and having enough time to assess goals and milestones making it equally beneficial for your clients. A group dynamic also allows pairing up when the workout calls for it, and it's the perfect size of class for your clients to build a rapport with each other.
How to set up small group training in your booking system
You want to make your admin tasks as smooth as possible when setting up your small group training classes. TeamUp makes it easy for you to set up the correct membership plans and then create a recurring class schedule for your members to sign up to. With this step-by-step guide, we show you how to get your small group training business off the ground.
Set up a membership
First off, you need to create a membership option for small group training sessions. In your TeamUp dashboard, head to the "Memberships" tab on the left.
Set up a membership
First off, you need to create a membership option for small group training sessions. In your TeamUp dashboard, head to the "Memberships" tab on the left.

Once there, click "Add a Membership":

With your small group training session, you want your clients to be regular attendees, so you're going to want to create a "Recurring Plan".

From here, you will need to name the membership plan and add a brief description explaining what the plan will offer your clients and what your training sessions will involve, and of course, make sure you check the "For sale" box.

You can now choose how you would like the membership to be presented on your customer site and app. We'd recommend making the plan visible on the memberships list and allowing customers to purchase the membership themselves to cut down on your admin, but ultimately, you have the freedom to choose whatever works best for you.

Under usability, select "Classes & Appointments", as you will be setting up a class with a repeating schedule rather than a course. You will also need to select the class type and assign a frequency restriction. This part is down to your small group training program. If your program is based on a certain number of sessions per week, then it's a good idea to use that as your point of reference.

Finally, you're going to set your billing plan. Set the price, the billing day, and we highly recommend setting a minimum notice period so that you don't lose out on a no-show or a late cancellation. You can also set a commitment length so that customers are contracted for a certain period of time; in our example below we have set this to 2 months minimum. TeamUp is incredibly flexible when it comes to finetuning your business.

Set up a class type
Now you have the membership plan set up for your clients you need to set up the class type that your members will be able to use with their memberships. This is a quick and simple task to do within "Classes/Appointments". First off, click "Create New".

Next, name your class and add a short description detailing what your classes will involve. You can then decide who to make the class visible for. you can also set your registration preferences, including how far in advance members can sign up and when they can cancel without losing the session. You should also make the registration available to members only since this is a regularly scheduled class rather than something that can be a one-off class.

The only other thing you need to do when creating the class is to assign which memberships have access. You're going to want to assign it to the recurring membership plan you've just created.

From here, click "Create Class Type" and it'll now be available on your dashboard when you set your schedule and availability.
How to schedule repeating classes
To create your class schedule, head to "Class Types" under "Classes and Appointments".

You're then going to select your newly created class. Once in there, you need to click "Add repeating time slots".

You can then select the time of your class, the days you will be holding them, and how often the schedule will repeat.

Finally, set your venue, which instructor will be leading the class, and even set the maximum class size.

You may want to add extra time slots each day or have different times for the weekend or specific days. All you have to do is repeat the process, and when you go into that class type again, you will see clearly what your schedule looks like for that specific class.

Set up a safety waiver
You need to make sure that you have all the legal documents and customer information required to run your small group training sessions without any risk for you or your clients. Setting up a waiver is as easy as clicking "Forms/Documents" and selecting "Waivers".

Once there, select "New Waiver", and you can create the waiver to include an agreement that clients understand that physical and strenuous exercise can result in injury but they accept you are not liable. If you have any doubts regarding the wording of your waiver, speak to your business insurance provider for advice.

Fine-tune your registration settings
This is a good opportunity to top and tail your new class and membership details. For example, maybe a one day cancellation period isn't preferable for you and you'd rather limit it to a few hours prior to class as it's more likely to encourage attendance. For this you need to go into "Settings" and "Registration". You can then select the class you want to change and click "Edit". Here you can be more specific about when registrations open and close as well as the cancellation cutoff time.

Set up a class reminder
A useful tool to ensure your clients are accountable for themselves as well as ensuring they don't miss out on an all-important session, in "Notifications", you can set up an automated email to your clients so they don't forget their pre-booked session. In "Notifications", scroll down to "Class/Appointment Registrations" and click "Detail" by "Pre/Post/Milestones".

Click "Add notification", and then select the amount of time before a class your reminder will go out under "Interval".

You then need to set up the "Conditions" of the email by selecting the class type, the venue, and selecting attending clients.

On the next page, you can select how the subject will show in the email, and then how to address clients. For example, I've selected the subject to be the class, date, and time, and then in the main text, it'll address the client by their name followed by the reminder. Then all you need to do is hit create. Whenever a client signs up for the class, the reminder will be sent out automatically.

Get your small group training sessions up and running!
Once you have your memberships, classes and all the nitty-gritty of payments and notifications set up, your clients will have no problem signing up to your classes through their member app. You won't have to worry about chasing people up or manually adding names to schedules or deal with payments. You can now start planning out your group PT sessions and enjoy building a unique community of people pursuing their personal fitness goals in a tight-knit group.
Find out more about group fitness here and how TeamUp can help personal trainers here.
Thanks for reading!


